Ingredients
Filling
6 medium apples peeled, cored and cut into small pieces
3 tablespoons unsalted butter
⅓ cup brown sugar
2 teaspoons ground cinnamon
⅛ teaspoon Diamond Crystal kosher salt
Topping
1 ¼ cup old fashioned oats
2 tablespoons all purpose flour
5 tablespoons cold unsalted butter cut into 5 pieces
⅓ cup brown sugar
⅛ teaspoon Diamond Crystal kosher salt
Sprinkle of ground cinnamon
Directions
1
How do you make cast iron apple crisp? Preheat the oven to 350F. Place cut up, peeled and cored apple slices in a large mixing bowl and set aside. Preheat a 10 inch cast iron skillet over medium low heat and melt the butter for the filling. Once the butter is melted, add brown sugar, cinnamon and salt by whisking it in. Pour the butter mixture into the mixing bowl that has the apples and toss until the apples are well coated. Add the apples and butter mixture back into the skillet and turn the heat up to medium. Stir occasionally while it cooks for five minutes, until the apples begin to soften. Remove the pan from the heat, but keep the apple mixture in it.
2
After the apples are partially cooked, cut the five tablespoons of butter into five separate pieces. In a medium mixing bowl, add all the toppings EXCEPT the ground cinnamon. Combine ingredients using either your hands or a pastry cutter. It is okay to have small lumps of butter throughout the mixture. Top the apples in the skillet with the topping evenly and sprinkle on the cinnamon.
3
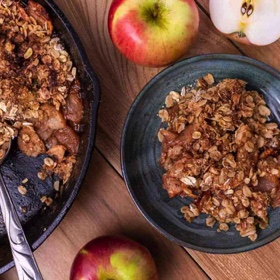
Place in the oven and cook for 35-40 minutes, until the apples are tender, slightly bubbling and the topping is crunchy. Remove from the oven and let it rest. Allow the crisp to cool for about 30 minutes before serving with ice cream or whipped cream.
4
Can you bake in a pan instead of a cast iron skillet? Yes! I recommend using a 9×9 metal pan as an alternative. Realistically any oven safe pan will work that’s a similar size. An 8×8 pan would work just as well but the crisp may be a little bit thicker and may take a little longer to cook. If you don’t have any of those options, you can grab a cheap disposable pan at the grocery store and it’ll work just as well.
5
Do you need to let this rest after pulling it from the oven? I recommend letting the dessert rest for about 30 minutes before trying to eat it. Before that it’ll be molten lava that will absolutely burn your tongue. After about 30 minutes it should still be warm and easier to serve.
6
Should you cover apple crisp when baking? No! If you cover the apple crisp while baking the crisp won’t get crisp.
7
Can you double this recipe? If you want to double this recipe you absolutely need a larger pan to cook it. The cooking time will be longer so watch it closely. Typically when I have to make extra I just make it in two separate pans and the cooking time is about the same.
8
Is six apples enough? This really depends on the size of your apples. Whenever I make it, I use medium apples and six is plenty. However, I’ve had readers say it wasn’t enough apples and added a few more. I’d make sure that the apples don’t overflow the pan but they do cover the bottom. The apples will cook down a bit. When you are cooking the apples on the stove top, you will be able to tell if you have enough apples.
9
What’s the best way to cut up apples? I use an old style apple peeler that peels, cuts and cores the apples all at once. This isn’t necessary but in the fall I make A LOT of apple crisp and this helps me a lot. It is a once a year tool though. If you want to do it by hand, peel the apples and then cut around the core. Next slice those pieces into your desired size. I’ve found a simple how to peel and slice an apple video if you’re a visual learner.
10
Preheat the oven to 350 F.
11
Add cut up, peeled and cored apple slices to a large mixing bowl and set aside.
12
Preheat a 10 inch cast iron skillet over medium low heat and melt the butter for the filling.
13
Once the butter is melted, whisk in brown sugar, cinnamon and salt.
14
Pour the butter mixture over the apples in the mixing bowl and toss until the apples are well coated.
15
Add the apples and butter mixture back into the skillet and turn the heat up to medium. Stir occasionally while it cooks for 5 minutes, until the apples begin to soften. Remove the pan from the heat, but keep the apple mixture in it.
16
After the apples are partially cooked, cut the 5 tablespoons of butter into 5 separate pieces.
17
In a medium mixing bowl, add all the toppings EXCEPT the ground cinnamon. Combine ingredients using either your hands or a pastry cutter. It is okay to have small lumps of butter throughout the mixture.
18
Top the apples in the skillet with the topping evenly and sprinkle on the cinnamon. Place in the oven.
19
Cook for 35-40 minutes, until the apples are tender, slightly bubbling and the topping is crunchy.
20
Allow to rest and cool at room temperature for about 30 minutes before serving.
21
Share the Flavor!
Notes
Use any of the following apples: cortland, empire, honey crisp, braeburn, mutsu, pink lady and granny smith apples. AVOID RED DELICIOUS.
You can use light or dark brown sugar for this recipe.
6 medium apples should be enough but if you’re using small apples you may want more. The amount of apples depends on the size of the apples. Just don’t over fill the pan!
If you don’t have a cast iron skillet you can use a 9×9 metal pan to bake the crisp.
Store cooked apple crisp in the fridge covered in plastic wrap. I usually remove it from the skillet to make it easier to store.
Reheat the entire apple crisp in the oven at 350F until warmed through or microwave individual portions.
This recipe was tested with Diamond Crystal Kosher salt, if you’re using a different brand, use less to taste.